Sunday, April 25, 2021

I get the picture

We were supposed to take a trip today but we had some things that needed checking and by the time we figured out the issue and got everything right yesterday, we had cancelled the flight.  That meant this morning I had time to go fly.


When I woke up I noticed that line of storms that passed through was still rather active to our South.  This was another great opportunity to work on my radar skills.  The past trips I had large weather systems but the storms near me were not strong, just some light rain and I was never able to get much convective activity in the location I wanted which was 25-80 miles away.  Today was different.


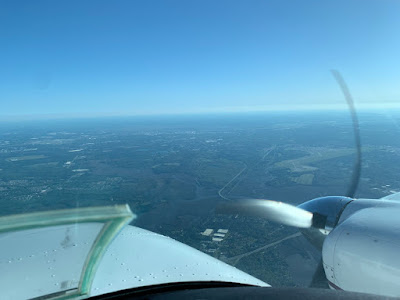
I headed down to Daytona area at 5500 and passing Saint Augustine checked in on 118.85 with approach.  I let him know I would be maneuvering North of DAB and he said to let him know as I maneuvered.  Approach was great and let me get all my practice in while keeping an eye on me.  Range and Tilt are the main controls with the radar.  As described in earlier posts, the radar reflects not just rain but also the ground.  The picture above is at +4.5 degrees and there is little ground clutter.


At 4 degrees, pictured above, I start seeing the coast and all the tall buildings.  At 3.5 degrees, pictured below, the ground is even more prominent.


This is what it looks like on XM Nexrad (pictured below).  Notice that the radar colors do not exactly align and their are differences in the displayed rain.  The rear right cell looks more uniform on the XM composite while it has distinct parts on the live shot.  This could be because they were shot at different times (Nexrad is delayed) or because the live is just looking at the slice directly ahead and there could be more rain above my beam.


It's an interesting but not a very important distinction as I would be avoiding the area regardless.  Both pictures have the steep color gradient which is a warning to give the storm plenty of room.

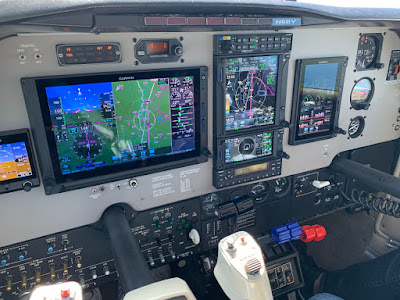
I also spent some time trying to figure out the best configuration to display all the data I have.   Above I have put the map back on the 750 and have the radar on the PFD.  I can actually run the radar on both screens with different setting but then the scans are divided between the screens so the updates are half the rate.  One really cool feature is the ability to display the active radar on the moving map.   

I really like this presentation as it is easy to visualize the weather in relation to the course.  The downside is that you don't have the radar controls but in most cases, once the tilt is set you don't need to mess with it very often.  I did some additional runs with smaller cells off to the side to see how it would perform.  There are some cells ahead to the right.  Visually they did not look like they were tall.  Also notice on the XM there is rain directly ahead which was not there in flight. That light green was just moisture in the atmosphere and often the XM or FIS-B are so sensitive that green by itself can basically be ignored


If I had been solid IMC, the active radar would have done a good job keeping me clear of the cells.  One other thing I wanted to try was how good the stabilization would be in a turn.  Many radars end up painting the ground on the inside of the turn as the dish does not remove all the bank.  The GWX70 did its job well and was clean in all turns.


Overall a great learning experience.  I will need more training but I think this summer will present ample opportunities to paint weather over Florida.

Wednesday, April 21, 2021

A quick swap


Not much will get me up at 6 in the morning.  I think the sunrise is beautiful and all but the concept of waking before it happens is the issue.  I figured out long ago that you can catch sunset and then just run the tape backwards.


While the list is short, radio upgrade is on the list.  The Baron came with a GTN 750 and 650 which are great radios and frankly I was really happy with them.  They did a lot more than my previous GNS 530W and 430W.  But, I had seen an add for a really good deal on an upgrade to the "xi" version of the radios.  Basically you give the shop the old radios and they slide in new radios with 2 faster processors, higher resolution screens and more features. 


I was weak and called them up to schedule the swap.    Technically it is a slide in replacement but it's not that easy.  In the end it took 3 hours in the shop but we are getting ahead of ourselves.  It all started with a very early alarm.  Then a check of the weather to confirm that all the rain from the last few days was finally gone.


I had a companion for the ride.  My daughter dropped into town and amazingly she got up early too and joined me.  We departed and headed South.  Our route was Ocala, Lakeland, Sarasota.  It was a quiet morning and we were cleared to HYZER, which I expected as it is a common point to join V157.  What I did not expect was direct Sarasota a few miles South.  It was a bit hazy but we soon had Sarasota International in sight.


Sarasota is an air carrier airport which makes you think busy and a lot more structure.  Well if you arrive early, you have 1 controller doing it all.  Same person for tower, ground and clearance.  I had studied my charts and after landing on 32, strategically made the turn off where we were going.  A quick taxi and we were shutting down at Dolphin Aviation.  The Avionics shop is located on their ramp so once shut down, I called and they dragged us over to the hangar.


My new radios were waiting on the counter.  Sam and I went off to the FBO to wait, and they jumped on the job.  They first had to upgrade the old radio software.  Then save all the configurations and then swap the radios.  Then you need to check all the configurations and fill out a bunch of paperwork.  The final step turned out to be the hardest.  The dealer calls Garmin and updates my database account with the new radios so my downloads will work.  It took them 36 minutes to get through, then it was a final database download and update and we were done.


So here they are on the trip home.  Can't really see the difference in a picture but they are faster and smoother and I am having fun with the new features.


Saturday, April 10, 2021

Radar spelled backwards is Radar

 I am working through my solo flight requirement the insurance company insisted upon.  Like the time with the instructor, I am trying to use the requirement to continue learning.  Today was a great day to work on radar skills.


Most people are are familiar with weather radar, stay away from the bright colors.  This is good advice but eventually you will need to fly in or near rain.  The trick is to avoid the severe weather and we have a variety of tools to accomplish this.  As you can see from the above picture, when I left today, it did not look like rain.


I have 3 sources of radar.  The first is broadcast via satellite using the XM radio system.  The second is sent via ground based transmitters and the final is an onboard doppler radar.  Interpreting all these pictures can be tricky.  The same image viewed on the panel screen has a different color coding when on the iPad.   I flew a good bit under the green area today and was not in any rain and the ride was smooth.  The picture is not wrong, it was just painting moisture at a different altitude than I was flying.


The two radars that are transmitted to the plane have the advantage that the picture is generated by the governments massive and powerful radars.  They also cover the entire country so I can see far, far away.  Also because the radars are a composite of many different antennas and their power, the chance that one storm can block the view of a storm behind its eliminated and you see a good picture of the actual precipitation.


It is not perfect though.  The ground based transmission you can't get while still on the ground so for the first few minutes you have no data from this source.  The bigger problem is that you are not looking at where the rain is, you are looking at where it was.  The picture is 5-15 minutes old by the time it gets to your screen.  Big picture this is fine but a fast moving storm could have moved 15 miles while you were waiting for the picture.  Also quickly developing storms can become severe before they evr show up on your screen.  That's why datalink weather is only good from strategic planning.


Airborne radar should solve all these problems except Physics.  The radars on the ground are huge, 28 feet across.  The dish in the airplanes nose is only 1 foot.  The NOAA radars have about 800 time the area and loads more power.  When you send out a radar pulse, the energy bounces off the rain and returns to be measured.  The more rain in the way, the more the energy is needed to see farther.  I have 40 Watts of power while the ground based units have 450,000 Watts.  Yes size matter.


Size matters not only for power but also beam width.  The radar is like a flashlight.  The further out it goes the wider the beam.  At 10 miles the core of my beam is 8000' wide.  That means it is 4000' above and below me.  At the full range of the radar (320 miles) the beam is 25 miles tall and wide.  In the picture above at 120 miles the beam is 18 miles wide.  What this means is that the farther out you go, your resolution suffers proportionally.


Sorry flat earthers, one more problem.  The earth is round.  Up close this does not matter much but at 100 miles, if you send your beam straight out, it is actually 7000 higher above ground because the ground has curved away from you.  Rain is basically visible from the freezing level down, ice does not reflect as well.  We compensate for all these issues by tilting the dish up or down to point the energy where we want it.  


One last problem, the ground is a great reflector so even on a clear day, the radar will paint what looks like storms but it will just be the ground.  Cities with their building look like bigger storms.  With all the problems, why bother?  Well if you practice a lot, you can learn how to direct that beam and understand what it is telling you.  The combination of old but very precise information with real time scanning of what you will fly through in the next few minutes is a powerful tool to avoid serious weather.


Having all those big screens means I can display the different sources how and where I like.  Above you can see the sky has gone from sunny to a dark wall.  Below I am watching datalink on the left and real time on the right,.  I am tilted up 4.5 degrees which eliminates most of the ground but the beam is above the farther rain and thus I am not painting any rain even though it is there.


One really cool feature is to overlay the live radar scan on the moving map.  While that looks really ugly, what you are actually seeing is the ground return, I had not yet adjusted the tilt.  Of course all this can get confusing.  If you display the radar on 2 screens it splits the back and forth scan and each screen gets one direction.  This way you can have 2 different settings at the same time.


After exploring the multitude of radar information, I turned around and made a quick gas stop.  Then it was back home before the storms arrived.


Saturday, April 3, 2021

Solo


Today was the first time I flew the Baron solo.  It was not my first solo but it was my first multi engine solo.  The routine was not much different than my instruction flights.  I started with a detailed preflight.  It was cool again today and I knew I would want the heater.  It had quit on the last leg yesterday.  I had a good idea why it quit and my pre flight confirmed it.

The heater is in the nose wheel well and if it gets too hot, it pops a safety and shuts off.  You need to press to reset but that's not possible while flying.  During preflight I pressed the magic red reset button and then heater operated correctly for my entire mission today.  I learned my lesson that it is important to have sufficient flow before pulling the heat control to full hot.

We brief the departure in a twin every time.  Some numbers never change, Vr is 85 and Vyse is 100.  The weight changes and expected performance changes so these are good to know so you can determine if things are happening as expected.  The other important brief is "the drill".  The drill is what you need to do if you lose an engine on departure.  It is pretty straightforward, you are checking the configuration and engine controls and if that does not bring the power back, you are feathering the bad or what we call the "dead" engine.

I have done "the drill" a lot lately so why do it before each departure?  The theory is that in an emergency you will sink to the level of your most recent training.  Practicing the process and the muscle memory over and over hopefully means that when you have a bad day, you will revert to what you have practiced again and again and execute it correctly.


Today, it was just for practice and everything worked as intended.  I spent the beginning of my solo time practicing steep turns and working out power settings I will typically use for economy cruising and sightseeing.  It is useful to have some go to settings where you know the engines will be happy and you you know the performance to expect.

After enjoying some sightseeing and just some relaxing flying, I contacted approach and got flight following up to Baxely, GA.  This is really just more training, short cross country flights to different airports to practice with the new to me radios.  I am finding it is really nice to have access to everything on the PFD.  Above I am briefing the arrival frequencies. Basically you can pull up everything about the airport from the charts to the weather without ever turning your head.


After a quick stop in Georgia, I was back in the air and headed for home.  The smooth air had turned choppy.  What I would call consistent light turbulence.  I crossed directly over JAX and then was handed off to tower and joined a left base for 5.  The winds had picked up but we had practiced all this.  I got my second very satisfying touchdown of the day.  A quick taxi back and the plane was back in the hangar.  I still need a few more hours before I can carry passengers but think I will enjoy this phase of training.

Friday, April 2, 2021

Ready to Solo


My first solo was back in 1985.  With my first aircraft, the insurance company wanted me to get 3 hours instruction before flying solo or with passengers.  My last plane they required zero time.  Moving to the twin was very different.  15 hours dual and then another 10 solo before carrying passengers.


Today I completed the 15 hours plus a little.  We decided to complete some more cross country training to practice the type of flying I will be doing with the plane.  It was cold this morning which also let me learn about the heater.  In a single you just use the engine heat ducted to the cabin to stay warm.  In the twin, there is a separate heater in the nose.  It takes a bit of talent to get all the knobs in the correct position to not be hot or cold.  Eventually I figured it out.

We departed into a stiff headwind.  At 5500 feet we had 25 knots on the nose.  This is why we flew at 5500 as the winds were mid 30s up higher.  Our first stop was KEOE, Newberry SC.  It was a strategic stop.  Fuel was well priced and it was positioned such that we would land with 2.5 hours of fuel remaining.  I am still being conservative with fuel reserves as we confirm that the fuel computer and gauges are accurate.

The only complaints with the stop were the wind and temperature.  South Carolina was much colder, near freezing.  I made quick work of the refill, though it took a bit of teamwork.  The fuel hose has a spring return and it would not stop in a locked position.  My instructor had to hold it while I fueled to keep it from retracting.

Topped off we loaded up and were soon on our way.  We checked in with Greer approach on 119.4.  Decades ago I used to fly quite a bit around Greenville and the frequency has not changed in all that time.  Our next destination was Oconee County Airport.  This is right by Clemson University.  It was also a trip down memory lane.


The last time I remember being there was in the mid 90s, I was giving Young Eagle flights in my Mooney.  Today it was pretty quiet but luckily a bit warmer and less windy than Newberry.  After a short break we were ready to enjoy the tailwind home.


We had planned a direct route but ended up with two detours.  On departure we quickly climbed to 9,500 feet and set power for 184 knots True Airspeed.  We had 30+ knots on the tail so we enjoyed better than 200 knots for most of the flight.


Part of the reason I wanted to do these cross country legs was to work on  my flows and how I will use all the tools at my disposal.  There is so much information available, you really need to think through how you will set everything so that you can easily absorb everything without getting distracted.


Back to the detours.  We were going to pass through a Military Operations Area (MOA) but it was in use.  You can still fly through but it is at your own peril.  We chose to divert around.  The iPad comes in handy as I marked some points along the edge and then sent the new plan to the panel.

This solved the immediate problem but the detour altered our later path and we would now go through some restricted airspace.  This time I used the on screen graphical flight plan edit function and altered our path around R-3007.  These were all good things as the purpose of the trip was to encounter and practice real world situations.


Heading down from altitude we were trueing out at 194 knots and making 228 ground speed thanks to 38 knots at altitude.  The arrival home was a bit choppy below 5500 but we were soon turning final.  Winds were blustery with gusts up to 30 knots. I flew the calculated numbers and kept a few knots extra to account for the gusts.  


The arrival was smooth and we were soon shutting down.  After the logbook was signed I was ready to solo but that will happen another day.